Catfud Revisited

Since I started making my own catfood back in August, I have refined my procedure somewhat.

For one thing, I’ve become more skilled at carving up a chicken carcass. With a good heavy santoku knife and sharp kitchen scissors I can skin and dismember a 4.5 lb chicken in about 20 minutes. I got considerably faster when I discovered there are pressure points that “pop” out the shoulder and hip joints, allowing easier cutting and removal.

One of the big problems I had in my early attempts was that bones would jam the machine and bone chips got jammed between the round grinding plate and the housing. Thus not only did I have to stop and clear the bone jam every few minutes, but it was very difficult to remove the plate to clear the jam on account of the jammed-in bone chips.

I discovered the solution: by trickling water through the input tube during the bone-crushing phase, the mechanism stays lubricated and there are no more jams. This also helps to keep the holes in the plate clear, making clean-up much easier.

Cutting the bones into smaller chunks also helps a lot.

I try to buy chickens not larger than 4.5 lbs, since smaller birds have smaller bones and that makes it easier on the grinder.

So here is my process:

1. Wash the chicken in running water to remove surface bacteria.

2. Skin and dismember the chicken. Discard the skin and as much fat as is convenient.

3. Remove as much muscle meat as possible from the bones (this gets easier with practice). Separate the muscle meat and bones in separate bowls.

4. Chop the bones into lengths not longer than 1 inch. This is quite satisfying if you use a sharp, heavy knife. I always keep my unused hand behind my back while doing this so that I am not tempted to chop my fingers off.

5. Measure out the water that is needed for this weight of chicken (see chart below) and set it near the grinder.

6. Install the medium plate (5mm diameter holes) in the grinder.

7. Send the bones through. After every few bones, trickle a few tablespoons of water into the intake chute. Don’t stand directly in front of the grinder, as meaty water will sometimes spit out. Don’t wear your good tuxedo when doing this.

8. When you’re finished with the bones, put the ground-up bones aside and put an empty bowl in front of the grinder output. Flush the grinder with a good portion of the remaining water (but don’t use too much– at the end of the day, you don’t want to use more water than the recipe calls for). You now have a bowl with bony, meaty water in it.

9. Open the grinder and scoop the bone chips that didn’t go through into your bone-water bowl. Set it aside; we’ll deal with it later.

10. Now install the large plate (8mm diameter holes) in the grinder. Send the muscle meat through.

Note: The idea here is that you want fairly large chunks of muscle meat for your cats to chew on. This is very good for their teeth as it is a natural way of removing tartar. I have read some recipes where people chop up their muscle meat with a knife rather than grinding it; I tried that with my cats and the chunks were too big– they didn’t acknowledge that the chunks were actually food and they ate everything except the chunks. All my cats except Jill, who was born feral, did this; Jill (who is known to have eaten her own children– more about that another day) tore into the big chunks with relish.

11. Set the ground muscle meat aside and use the remaining water to flush the grinder; use the bowl of bone-water from earlier.

12. Open the grinder and scoop anything that didn’t grind into the bone-water bowl.

13. Pour the contents of the bone-water bowl, along with the unground bones, into a blender and run it on high for a few minutes. The result will be a nice pink mush of watery goop. If any large bone chips remain, discard them.
14. Add your nutritional supplements: egg yolks, vitamins, psyllium. Add psyllium last as it is a coagulant and if it sits too long you will be left with a firm stinky mass of jell-o that is hard to work with.

15. Mix the bone-meat, muscle-meat, and supplements in a big bowl. Decant into containers, and freeze.

That’s it. It takes me about 2 hours to process 9 lbs of chicken, including clean-up.

Here are the proportions I use:

Chicken (lbs) 4.0 4.5 5.0 5.5 6.0 6.5 7.0 7.5 8.0 8.5 9.0 9.5 10.0 10.5
water (cups) 1.8 2.0 2.2 2.4 2.7 2.9 3.1 3.3 3.6 3.8 4.0 4.2 4.4 4.7
taurine (mg) 3,555.6 4,000.0 4,444.4 4,888.9 5,333.3 5,777.8 6,222.2 6,666.7 7,111.1 7,555.6 8,000.0 8,444.4 8,888.9 9,333.3
Vitamin E (IU) 711.1 800.0 888.9 977.8 1,066.7 1,155.6 1,244.4 1,333.3 1,422.2 1,511.1 1,600.0 1,688.9 1,777.8 1,866.7
Vitamin B (mg) 177.8 200.0 222.2 244.4 266.7 288.9 311.1 333.3 355.6 377.8 400.0 422.2 444.4 466.7
salmon oil (mg) 1,777.8 2,000.0 2,222.2 2,444.4 2,666.7 2,888.9 3,111.1 3,333.3 3,555.6 3,777.8 4,000.0 4,222.2 4,444.4 4,666.7
psyllium husk (tsp) 3.6 4.0 4.4 4.9 5.3 5.8 6.2 6.7 7.1 7.6 8.0 8.4 8.9 9.3
egg yolks 3.6 4.0 4.4 4.9 5.3 5.8 6.2 6.7 7.1 7.6 8.0 8.4 8.9 9.3

Notes: I tried using the egg whites, but my cats couldn’t stand the taste. I’ve also read that they can’t digest them.

I haven’t been able to find the supplements in free-form, so I have to waste quite a bit of time opening up the gelcaps and pouring out the powder (or, in the case of the oils, piercing them and squeezing it out).

As for the Taste Test… my guys love it. I tried giving some to Sammy, a feral kitten I’m confining until I can get him fixed next week, and he scarfed it down and now won’t touch the canned food I give him. Picky. Sheesh.
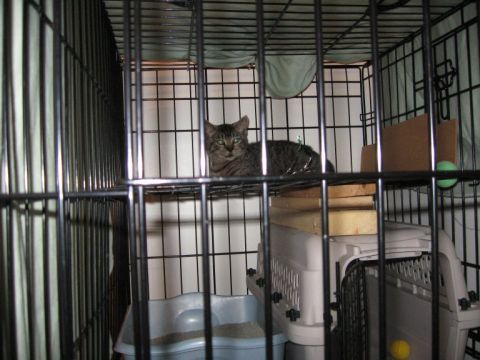
Sammy In Jail

Posted in Cats | Leave a comment

Oracle Error Messages

I’ve got a script that runs through the alert logs for all the Oracle databases I manage every 10 minutes or so and sends me a text message containing the error number if it finds an error. Sometimes, when the errors are of the more exotic variety, I am left scratching my head– Do I need to leap into the batmobile and race to the nearest terminal to avert the latest crisis? Or can I continue sunning myself on the roof of my Barcelona penthouse? It is always a dilemma.

I could look up the error on one of the scads of websites out there that list Oracle error messages using my Treo‘s (painfully slow) Internet connection, but that is, as I believe I said, painfully slow.

Makes me wish there was a lightweight web page out there, without images or advertising, where I could look up the error and get a quick synopsis of it.

Well now, thanks to me, there is such a web page: http://phlonx.com/oerr

It contains all the currently-documented ORA, PLS, and RMAN errors. I could add more if I find I need to add them or if someone requests it.

One nice feature of this page is that it accepts alphabetic input from a Treo keyboard. For instance, to look up ORA-16005 you don’t have to toggle your keyboard to numeric input, you can just type eg00f and it gets automatically translated.

Ironically, the Oracle error messages reside in a MySQL database. Massaging the raw data into valid INSERT statements was a bit of a chore in the beginning because I was using as source material a file that comes installed with every (Unix, seems to be lacking from Windows) Oracle installation: $ORACLE_HOME/rdbms/mesg/oraus.msg. This file is rather sloppily maintained, making it difficult to parse out the different fields in a consistent way. Took me a lot of trial and error.

This file only contains the ORA- errors, so for the others I had to turn to the official Oracle documentation itself: http://download.oracle.com/docs/cd/B19306_01/server.102/b14219/toc.htm …and reformatting the raw data in those pages was a breeze using Textpad and regular expressions. This technique missed the fields that span multiple lines, but I didn’t worry about that since those are few and could be handled manually.

Posted in Databases | Leave a comment

Catfud

Back when the tainted petfood scandal broke earlier this year, I resolved to make my own catfood. (Which is to say, I would continue to eat my own regular food, but I would make catfood for my cats).

Grinder of MeatIt wasn’t until I met someone who did it herself that I was inspired to take the plunge. My Northern Industrial Tools Electric Meat Grinder finally arrived, and I took it for a test drive with a whole chicken I bought.

I’m a squeamish city boy not used to handling wildlife. Never seen a whole chicken before (except at the petting zoo). I was surprised to find a little paper bag full of organs inside the chicken– quite a convenience! I had no idea chickens had evolved to the point where their vital organs grew in paper bags.

It was hard not to anthropmorphize the chicken. Peeling the skin off was a bit of a chore. It reminded me of trying to wrestle the dress off a… well never mind.

I also discovered the importance of having a good sharp knife (I don’t). After a few minutes of hacking the chicken ceased looking like a prom date and more like Alien.

I worried about the bones. This grinder is not rated for bone crushing, but my informant assured me it handles chicken bones without a problem. So it does. First I sent the bones through using the coarse filter, but found the bone fragments a little big for my comfort. So I sent it all though again using the fine filter, so that the resulting bone fragments had a consistency of fine sand.

My recipe was simple. I added water and taurine; there are other things I could (and should) add in like psyllum, once I get them.

But the proof of the pudding was in the eating… of which there has so far been little. All my indoor cats have so far turned up their noses, but the ferals outside love it.

The problem I think is that they’re addicted to dry food. I started feeding Purina One for Sensitive Systems to Squid, who has a sensitive tummy, and when everyone turned out to like it, I just fed that to everyone by default. So training them out of the dry food habit will be a chore.

Here are links to the instructions I followed:

http://www.catnutrition.org/pictorial.php

http://www.catinfo.org/makingcatfood.htm

And here is a really excellent and detailed blog post about the ins and outs of making your own catfood. I highly recommend it.

https://www.wwwallaboutcats.com/making-cat-food-homemade

Posted in Cats | Leave a comment

Renaming your Windows XP user account

Someone recently asked me how to rename their C:\Documents and Settings\mysername folder but they didn’t leave a correct email address so my reply bounced. So here, for the benefit of all, is my answer.

Under the Documents and Settings is a folder saved in my name instead of my sons. When I had the new hard drive installed and XP the tech used my name instead of my son. Since it is a system folder I cant change it and really don’t want to pay another bill for trying to. Any other option?

Tosca

Tosca,

As far as I know, you cannot change the name of that folder since it is linked to your user name, and that cannot be changed. (You can change the user name alias, which appears on the login screen, but that does not change the name of the underlying folder in “Documents and Settings”).

You can, however, create a new account, transfer all your settings from the old account profile to the new one, and then delete the old one.

In detail:

Let’s say you have an account named “dad” and you want to change it to “son”.

Go to Control Panel, User accounts, Create a new account.

Type in the account name (“son”), click Next, make the account type “administrator”.

Restart windows and log in using the “son” account you just created.

Right-click on the “My Computer” icon on the desktop, choose Properties, and click the Advanced tab.

Under “User Profiles”, click Settings.

Select the “dad” profile from the list, then click “Copy to”.

Click the Browse button, and browse to the location of your new user profile (it should be in C:\Documents and Settings\son

Click OK, Yes (when it asks if you want to delete the contents of the directory), then OK out of all the dialog boxes.

Restart the computer and log in as “son” again.

Finally, you can delete the “dad” account from the Control Panel, User Accounts.
Hope this saves you a trip to the tech guy!

Posted in Computers | 11 Comments

Three Normal Forms tutorial revised

After two months in the wilderness, my tutorial on the Three Normal Forms is back online.

I took it down because in the original, it had some serious flaws. While not factually inaccurate, the section pertaining to NF1 was vague and misleading, and actually belonged in the NF2 section. I have corrected and expanded the NF1 discussion, and I hope I have not obscured the simplicity of the original tutorial.

Thanks especially to Richard Moignard whose helpful feedback finally inspired me to make the changes.

Posted in Databases | 2 Comments

Gigantic Sea Turtle on Staten Island

Saturday morning I was jogging down South Beach a little south of the Verrazanno Bridge when I came upon a stupefying sight: a huge sea turtle had crawled up on the beach and died. It was a little awe-inspiring, because the turtle’s great size implied great age. I measured it with my steps; it was 4′ 8″ from tail to beak. I stood there for a while, wondering why nobody else around seemed interested in this remarkable creature, then continued with my run.

After getting home I decided there must be someone who would be interested in such a thing. I called the Bronx Zoo but couldn’t get past the receptionist who insisted the zoo doesn’t make house calls and she said I should call the City to get it cleaned up.

That wasn’t quite what I had in mind, so next I called the New York Aquarium and was transferred to someone in “the lab”. The woman I spoke to seemed quite interested and took down whatever little information I could give her.

This afternoon Cancer-grrl and I went back to take a look. I was a little worried that I might have dreamt the whole thing. As we approached the spot on the beach the turtle was no longer where I had originally seen him, but he had come loose and was floating with the tide just a few yards offshore. He was being buffetted pretty badly by the waves and it will no doubt not be long before he starts to disintegrate. We were able to take these pictures. This was a majestic beast and it felt important to make some kind of record of its death.

I think it was a loggerhead turtle, which has been known to frequent Staten Island.

02.jpg

10.jpg

18.jpg

20.jpg

14.jpg 11.jpg

21.jpg

22.jpg

Posted in Miscellaneous | 4 Comments

E-Z Putty Tunnelling

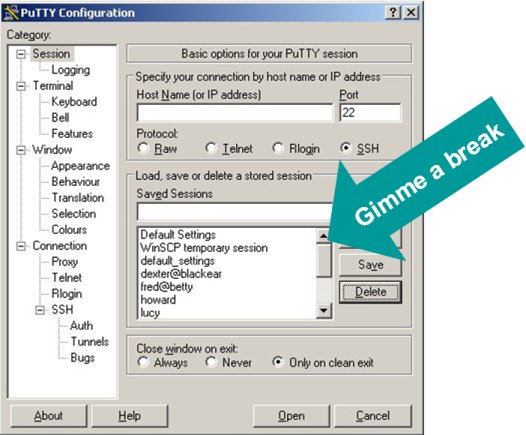
Putty is a great if you only have a handful of servers that you connect to on a regular basis. But as a consultant with a growing list of clients you can rapidly find yourself having to deal with a larger and larger number of servers, and scrolling through that little list of Putty saved sessions can become a nightmare.

putty3.jpg

Then there’s tunnelling. It’s easy to set up tunnels in Putty, so that you can connect to a gateway and then use that connection to jump to a target server in the client’s network, but connecting is always a 2-step process. You have to hunt for and double-click on the tunnel session, and THEN double-click on the connection for the server you actually want to work on. If you’re using Linux or Cygwin you could write a shell script that would streamline things, but under Windows you’re stuck with a whole mess of clicking.

And here’s another annoyance: suppose you spend hours setting up all your Putty profiles, and then you need to transfer those settings to another computer. It’s possible, but it involves dumping and importing registry keys.

Well, life is too short. Here’s a technique for bypassing these putative drawbacks of Putty. It assumes you

  1. have Putty and Plink installed; and
  2. are running Windows.

I assume you have a basic understanding of what ssh tunnelling is and know how to set it up using the Putty GUI. There is a ton of HOWTO’s out there on the subject so I won’t belabour the point here.

No brain surgery is involved. We just write a Windows batch file for every connection we want to make. Then we can categorize these batch files however we like in the filesystem, make shortcuts on the toolbar, the desktop, whatever. The syntax is simple, and you only have to double-click once per connection.

Let’s suppose we want to access a corporate LAN via a gateway:
gateway.foobar.tv

and behind that gateway, there are three servers (not visible to the Internet) that we regularly work on:
dev.foobar.tv
prod.foobar.tv
qa.foobar.tv

First, for this set of servers, write a batch file that defines environment variables that are common to all the connections in the group:

localenv.bat

@set GATEWAY_USER=fred
@set PROD_PORT=3001
@set DEV_PORT=3002
@set QA_PORT=3003

The @ simply prevents these statements from echoing to the screen when they are executed.

The *_PORT numbers are of your own choosing; they are used to bind ports on your own computer to the different tunnels. To get an idea of what ports are currently in use on your machine, do netstat /ar at a command prompt.

Next, write a batch file that will launch both the tunnel and the target server connection together:

prod.bat
(line numbers added for reference only)

[1] @CALL localenv.bat
[2] start “Prod” /b “C:\Program Files\PuTTY\plink.exe” -ssh -l %GATEWAY_USER% -L %PROD_PORT%:prod.foobar.tv:22 -P 22 gateway.foobar.tv
[3] @ping 127.0.0.1 -n 3 -w 1000 > nul
[4] “C:\Program Files\PuTTY\putty.exe” -ssh -l fred -P %PROD_PORT% localhost

Line 1 loads the environment variables.
Line 2 launches a Plink connection in a separate window. Why use Plink? You could have used Putty, but Plink just provides a plain vanilla DOS window that maintains the tunnel whereas Putty is a pleasing interface that you can copy/paste in and customize to suit you. Notice the “start” command, which launches Plink in its own process (kind of like appending “&” to the end of a BASH command).
Line 3 is our way of getting around the fact that the Windows batch language does not by default provide a “wait” or “sleep” command. There are numerous ways to get around this limitation… This line basically waits for 3 seconds while the Plink window sets up the tunnel. You may have to adjust this wait time depending on network conditions.
Line 4 creates your main Putty window.

I trust it is clear from this example how to create dev.bat and qa.bat as well.

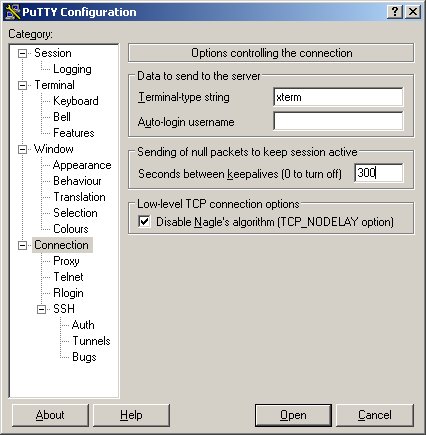
Another annoyance is the server will frequently boot you off if you are idle for too long. While there is no command line switch for sending keepalives, you can do this: Set up a new session using the Putty GUI. Go to the Connection section and enter, say, “300” at “Seconds between keepalives”. Don’t fill in anything else, just save the session, give it a name, and then add it to Line 4 of your batch file like this:

[4] “C:\Program Files\PuTTY\putty.exe” -load “default_settings” -ssh -l fred -P %PROD_PORT% localhost

This will send a packet to the server every 5 minutes and (hopefully) keep your idle session active.putty2.jpg

So there you have it. A convenient way to manage tunnel connections with Putty that is easily transportable from one computer to another.

Posted in Computers | Leave a comment

3 Normal Forms

At long last, and after repeated fan requests, I have gotten around to converting my 3 Normal Forms tutorial into a printable PDF, which can be downloaded here.

This tutorial, targeted at beginners who are trying to learn the basics without the complexities of advanced database theory, has received rave reviews from such exotic locales as India, Sweden and Bhutan. The tutorial is free; all I ask for in return is the occasional kind word and soggy crust of bread.

If you don’t know or care anything about database normalization, my tutorial still has value as a soporific.

Normalization Tutorial

Posted in Computers | Leave a comment

Back in the olden days

My first contact with computers came in 1977 or ’78 when I was in grade 5 or 6. Because I was smart, I got to spend a half-day a week in the computer lab at the University of Alberta with a half-dozen or so other “gifted” kids. I think about that experience a lot and wonder how it colored my later love/hate relationship with computers.

The computer lab consisted of dumb terminals wired into an Amdahl mainframe. I don’t remember the model number, but the U. of A. must have been on the bleeding edge of new technology at the time since I see that Amdahl came out with its first mainframe in 1975. I think it was in the Education building, but not sure. We got little pink cards for each program we worked with that contained our login name and the program name (I don’t think we had passwords). One program I remember working with was FUNDP, “Fundamentals of Data Processing”, which was a BASIC-like program. Maybe it was BASIC. I can find no Googlable reference to FUNDP, so I’m starting to think that FUNDP was just the course name, though there was no formal classroom instruction; we all went at our own pace. FUNDP (pronounced “fun dip”) permitted us to write scripts, take user input, and do some very primitive graphical manipulations (like place text in various places around the screen; this permitted one to create crude bitmap images with asterisks).

Then there was FRAND, a French language learning program. It was quite a fantastic multi-media experience, for its day. Before logging in you would take a reel of still images and an audio tape (it might have been reel-to-reel since cassette tapes were not in common usage yet) from a cabinet on the wall. Then you would sit down at one of the special multi-media workstations which were equipped with a TV-sized projection screen (apart from the CRT monitor itself) and an audio tape player. You would queue the image reel into the projector and the audio tape into its player, and then log into the FRAND program on your terminal. The projection screen would show an image, the audio tape would ask you a question, and you would register your answer on the terminal screen with a light pen. The whole mess had to be queued properly and started at the same time or it would be all out of sync, but once started I think that signals from the CPU would auto-advance the film and audio based on the user’s interaction with the program.

The conceit of this program was that you didn’t need to know any French, and that it would use only French to get you to learn French. So the question would be, “Qu’est-ce que c’est?”, you would see an image of a question mark, followed by an image of a grapefruit, and then the audio, “C’est une pamplemousse.” And in this way you were to learn how to say “grapefruit” in French.

I guess the people who wrote the program thought this was pretty clever, but I didn’t have a freakin clue what was going on. Getting the machine to work was an easy thing for me, but the content was beyond my reach: I couldn’t grasp that the machine was showing me a picture, asking me what it was, and then telling me what it was. My inability to grasp this simple device has made me very skeptical of science fiction stories where alien races are able to learn to communicate easily. If I was stuck in a cave with a sentient slime-creature from Zebulon Prime I would probably just eat it before learning how to communicate with it. So much for being “smart”.

It has also made me sympathetic of older people (and Mac users) who are unable to grasp the simplest computer-related concepts that I take for granted, like the difference between core and physical storage, or the meaning of instructions like “right-click on the Start button”, or the difference between “double-click on icons” but “single-click on buttons”. The makers of Windows think these things are obvious, and perhaps they are obvious to me and indeed most computer users these days, but I can understand how some people can (and do) have a blockage in understanding such things.

Posted in Computers | 1 Comment

I blog.

I wish I had something to say!

betty

Posted in Miscellaneous | 3 Comments